
As the fields of various firearms technologies evolved, we’ve seen the capabilities of the different types of small arms grow in scope and diversity. What was originally the same gun shooting shot or ball, with a shortened pistol variant for belt carry, has become a wide variety of guns tailored to specific needs, with one of them being long range shooting. Today’s rifles can shoot a long way, but there’s no point in doing so unless you can do it accurately. In today’s article, I’ll go through an introduction to small arms ballistics, and what you can do to hit the target with each shot.
Physics, the bullet, and you
A bullet’s path is not like a laser; it doesn’t go in a straight line, and you’re not going to get the bullet’s point of impact to match where your sights are pointing at more than one distance (sometimes two) at a time. You’ve got to worry about a few different things while shooting at range, but the most important ones are elevation, windage, and range.
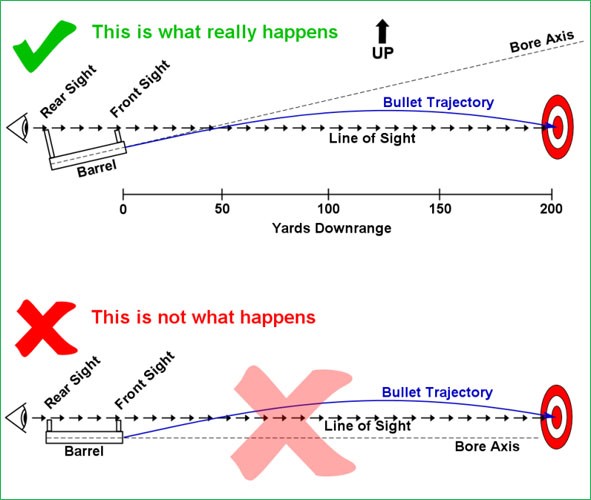
Elevation is fairly straightforward once it’s understood. Think of three balls. You drop one, throw one on a purely horizontal line drive, and shoot one out of a tennis ball cannon horizontally as well. Assuming they are all dropped from the same height, what happens? Those of you who paid attention in physics class will recall that they will hit the ground at exactly the same time. Put more simply, a bullet falls just like anything else.
“Ok, Luke, I understand; so a bullet will be two inches low at 200 yards, 4 inches at 300 and 6 inches at 400 and so on?” Not quite; there’s two problems with that. The first is, just like jumping off a cliff into a lake, you are accelerating downwards under gravity, so the longer a bullet flies, the faster it will drop just by gravity alone. The second is air resistance; the bullet slows down due to drag, and, as such, has more time to fall per horizontal distance traveled.

Note how the bullet is dropping faster (y-axis) as it gets further away in range (x-axis)
The takeaway on elevation is that, due to gravity and air resistance, bullet drop is fairly trivial at close ranges of a couple hundred yards, starts to play a big role at medium ranges of several hundred yards, and is monumental outside of 1000. Your typical, over the shelf rifle running a 5.56 or a .308 will run out of effective range quickly after 500 yards, be totally spent at 1000, and it is absolutely possible to miss spectacularly at those latter distances due to improper sight dope (data on previous engagements, i.e. “what does my gun do at this distance?”)
Windage is the effect of the wind on your bullet. Put simply, wind will blow your bullet off course in its direction. We have a few things to consider. Wind is considered full value if it is blowing 90 degrees to your shooting, as in, coming across the range, and half value if it is at a 45. If it’s blowing straight on, either from the front or the back, it matters less, and is fairly inconsequential at closer ranges.
Wind does silly things, and there may in fact be wind blowing from the opposite direction at your target than it is at the firing line. Wind tends to have more effect downrange, as the bullet is slower then than at close range, but the best rule of thumb is that less wind is better, and the less sideways it is is better, too.
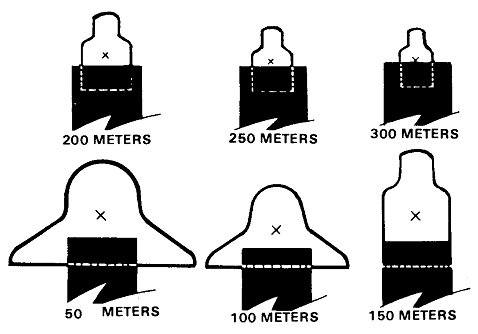
Lastly is range itself. You must know how far you are away from the target in order to add the correct elevation to get the bullet there. On an actual gun range, the targets will be at set common ranges like 200 yards. Most rifles are set up so that they fire well at close range with the sights set to a default position. This is a concept called “Battle Sight Zero” (BSZ) and it means that you don’t have to worry about sight adjustments inside a certain amount of range. For instance, the M4 carbine has a BSZ of 300 yards; anything inside that range can just be aimed at and shot, you will be close enough. Outside of that, start dialing in elevation.
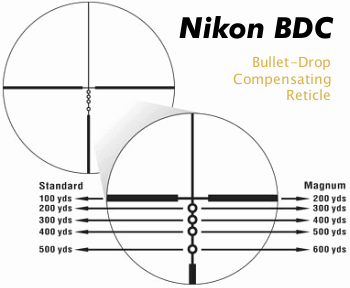
Bullet Drop Compensators are relatively new, you just use the appropriate bubble for the range and it takes care of the rest. You can see how close 100, 200, and 300 are, and that’s the idea of Battle Sight Zero; at closer ranges, you’ll still make effective hits even if it drops some.
The concept of “zero”
Many people go to the range, sight in their guns, and call them “zeroed.” Like said in a previous article, that’s not zeroed, that’s simply sighted in. There’s a difference between fixed sights (where the sights are soldered or dovetailed or simply part of the gun itself), adjustable sights (where you can set them for whatever single distance you want), and zeroable sights (where you not only make the sights on at a single distance, but you set the sighting system up to read correctly at that distance and others.)
Let’s use a couple examples here that are fairly straightforward to get the concept down. The first example is the US Rifle Cal. 30 M1, the Garand, and its sights. Garand sights are some of the best out there, and using them to explain zeroing works, mainly because they have both elevation and windage zero, unlike the M16 system.
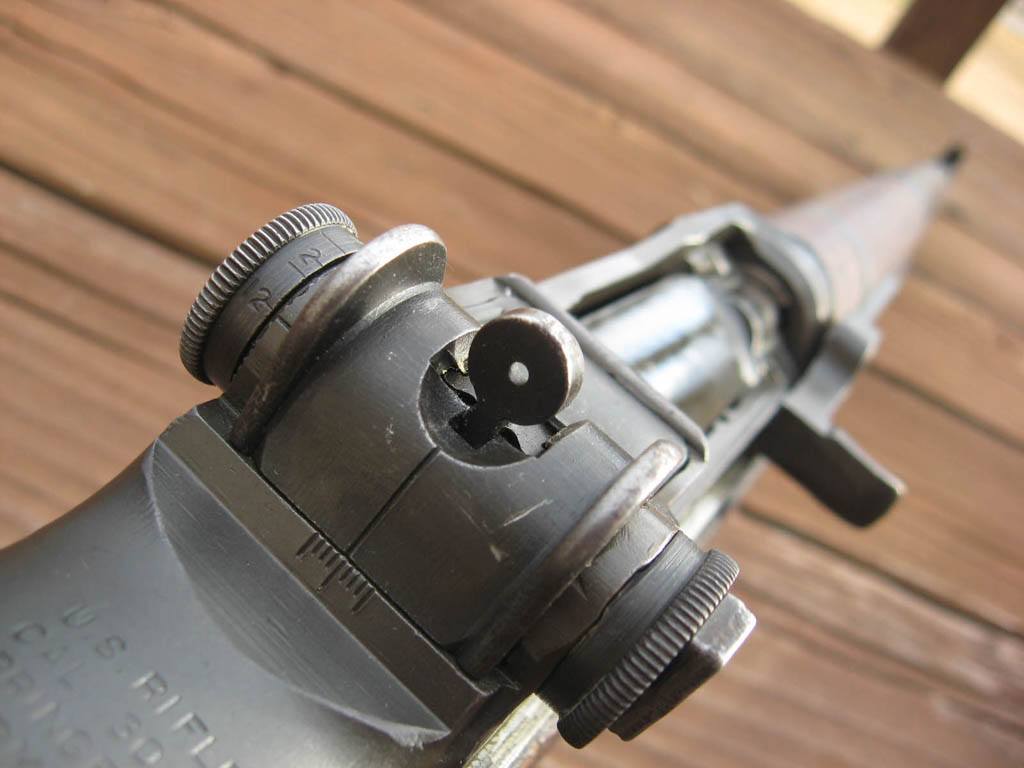
Mechanical Zero. The right dial has the sight centered on the windage indicator at the bottom, and the left dial is backed down from the 200 yard “2” and the 100 yard (line below the 2) down to bottomed out at “12” (which is the max height, 1200 yards, once rotated around one full turn.
The first thing you do is set mechanical zero, which is when the sights are indicating on their dials that they are set with no windage, and no elevation. That means crank the windage knob to be center, and the elevation knob to be bottomed out. Garands happen to be set up for about seven clicks up off mechanical zero elevation to be close to being right, so doing that, then shooting at a 25 yard target is the first thing.
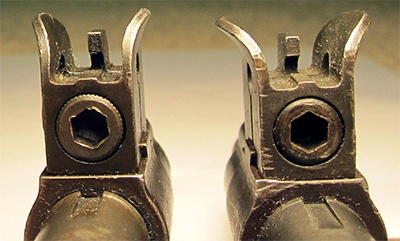
Garand Front Sights. Loosen that Allen bolt, then slide it opposite the way you want the bullet to go, just a bit, tighten down, and check again.
The second thing you do is leave the windage knob alone, and, instead, adjust the left/right to get on the bull with the front dovetail alone. See a previous article for sighting in. The rifle is now shooting straight left and right, and, just as importantly, it indicates no windage added, which means it is now zeroed for windage. If there WERE wind, and you were shooting at a range it would matter, you could dial in windage to shoot, then take it back out later, and be “on” again. That’s the point.
For elevation, you would actually use the elevation knob, but you don’t yet care what it says. Get it on the bull at 25 yards, then go to 100 yards and adjust as needed. Once on the bull there, you loosen the screw on the elevation dial, then twist the dial (which moves only the dial) to show “1” at 100, then tighten it down again. Now that you have done this, it is zeroed for elevation at 100 yards, and, if you wanted to shoot 400, you would crank the dial to “4,” shoot, then later reset to 100 yards at “1” and be back where you started. One should always leave sights set for close range work as a habit, you might not have time to change them.
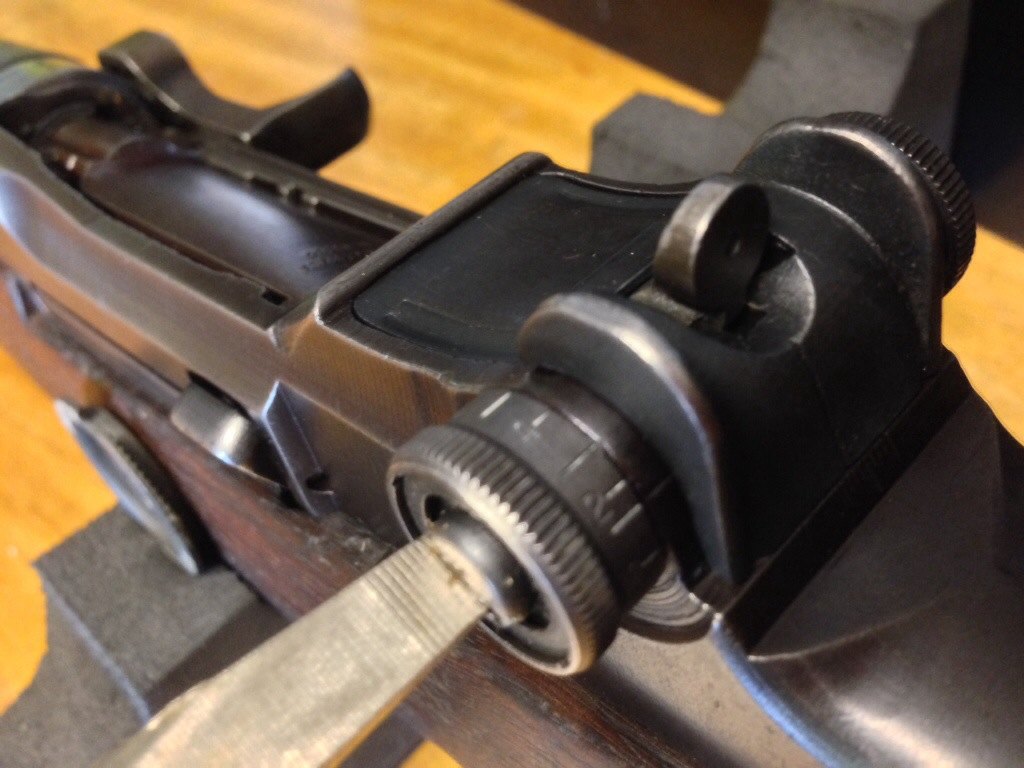
Screwdriver on the screw you loosen to just move the elevation dial (which currently indicates 1 for 100 yards. (There’s only numbers on 2 and 4, 1 and 3 are implied with the lines)
For scopes with turrets (scopes with dials are simply adjustable and have no zeroes), the idea is even easier. You simply get the rifle shooting the way you want it, at the range you want it (which is usually a 50 yard or 100 yard zero), then you loosen the set screws which allow the dials to free spin, set them both to “0” (hence the name of the endeavor) and then retighten. You are now zeroed at that range.
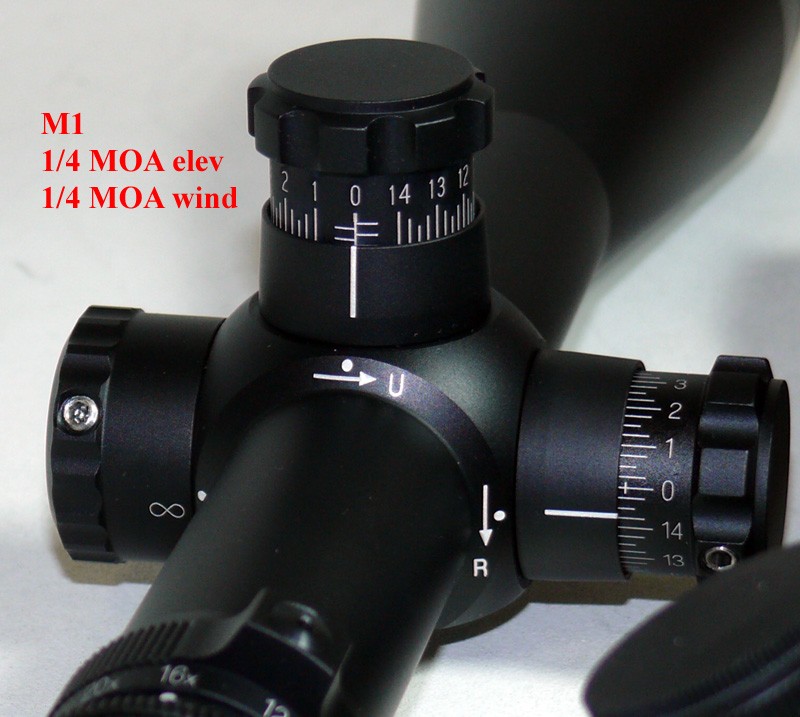
Leupold M1 Turrets (I like these). This scope has zero elevation dialed in, and 1/2 MOA windage to the left. See the allen socket next to 13 on the right dial, that’s what you loosen to set the dials to zero once the rifle is shooting right at your desired zero’s range.
Shooting at range
Shooting at range has two additional steps than shooting at close up distances, but, provided you do your homework, it’s actually not any harder than shooting close. Those two steps are range estimation and sight adjustment, and they are followed by shooting as normally done.
Range estimation is vital. People cheat nowadays using range finders that bounce an infrared beam onto your target and measure the time of return to get the distance, but the old fashioned way is to know your sight’s architecture in terms of Minutes of Angle or Mils, and knowing about how big something is in real life, and comparing the two.
For an example, front sights on military guns are often about 4 minutes of angle wide. This means something 4 inches wide at 100 yards would be the same width in your target view, and so would something 8 inches at 200, 12 at 300, 16 at 400, and so on. A person, who is usually 20 inches wide, would be just as wide as your front sight on this rifle at 500 yards, and that’s also about the limit of iron sights.
Not the best graphic, but you can see how the sight width in relation to the target width’s ratio changes with distance.
More importantly, someone who is a little more than double the width of your front sight is a little under half the distance to 500 yards, i.e., 200, and you know where to set your sights, even though if he’s only 200 yards away, just aim at him and fire already, but you get the point; you use the ratios of the apparent size of your target to something you know about your rifle (either the sight width like we discussed, or the size of your field of view at a given power in your scope’s vision), and, by knowing how big it actually is, you can extrapolate the range.
Once you know the range, you either set it on the dial of your weapon that is set up for what you are doing, like iron sights usually are, or you add the appropriate amount of clicks to manually put in the MOA or mils of the “come up” you want. Let’s use the .308 Winchester for an example; it typically drops 4 inches at 200 yards, 12 inches at 300 yards, 28 inches at 400 yards, and 50 inches at 500.
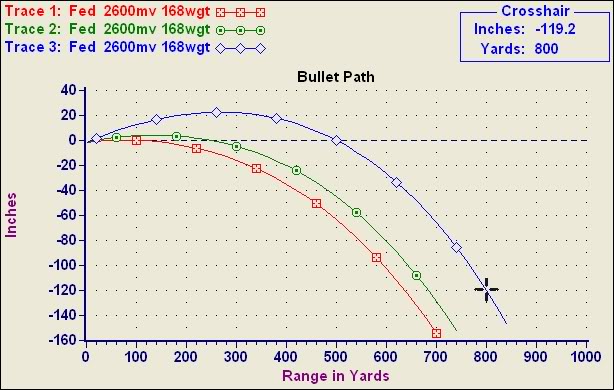
Follow the red line from a 100 yard zero, to 4 inches low at 200 (2 MOA), to 12 inches low at 300 (2, 2 = 4 MOA), to 28 inches low at 400 (2, 2, 3 = 7 MOA) to 50 inches low at 500 (2, 2, 3, 3, = 10 MOA). Minutes of Angle (MOA) is roughly equal to your inches off center divided by your hundreds of yards range, i.e. 50 inches / 5 hundred yards = 10 MOA.
That’s hard to remember, but, if you put it in MOA, it’s easier, and becomes 2, 2, 3, 3. Remember, MOA is close to inches divided by the hundreds of yards, so a 4 inch drop at 200 is 2 MOA, and a 50 inch drop at 500 is 10 MOA, and that is the first and last ones of that 2, 2, 3, 3 thing (2 and 10). This is simply a rough guide, you will develop specific come-ups for your own rifle, and should write them down and have them handy when you go shooting.
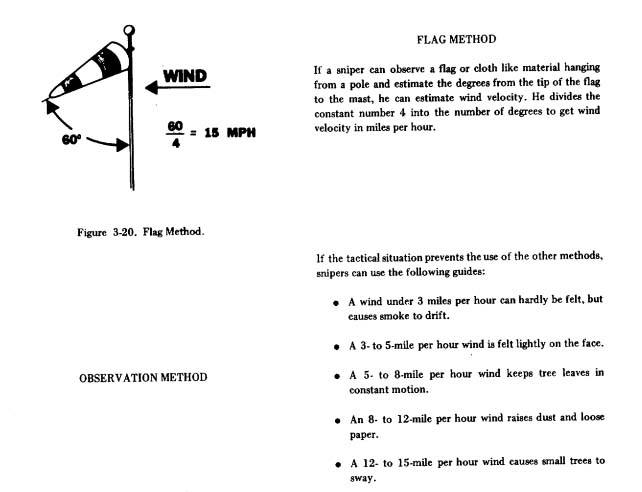
For windage, if it’s a near constant wind, you can figure out how fast it is going by an anemometer (wind gauge) or you can observe the effects from the wind on plant life and flags and extrapolate. You can then plug that into a chart for your bullet type, or you can use a Marine formula of the hundreds of yards you are shooting times the wind speed divided by a math constant of 15 for a close number, ie, a 300 yard shot with a 10 mph wind needs 2 MOA of correction.
This is rapidly getting beyond the scope of one Return of Kings article, so I’ll end on windage with, for most shooting, it’s enough to simply “hold into the wind” i.e., shoot towards the side of the target the wind is coming from and you’ll be fine. Elevation compensation, however, is serious business and you’ll end up in the dirt in front of the target if you don’t do it right.
Conclusion
Most anyone can be dangerous with a gun at close range, but it takes some actual skill and practice to be able to shoot at longer ranges. Whether it be for hunting, fun, or preparing for any sort of threat, a man ought to know how to be effective out to 500 yards. Be safe.
Read More: How To Properly Fire A Gun
Leave a Reply